Overview of the program
The download includes the VC_Redist runtime packages for Visual C++ 2005, 2008, 2010, 2012, 2013, 2015, 2017, 2019,2021,2022 and 2024. Both 32-bit and 64-bit are supported. The files included are the English language version.


General Info:
Windows 10 Pro 21H1 (Compact & SuperLite) 19043.1021
ISO Size: 1.29 GB
Author: FBConan
Supported Languages: English only during install, Additional Language Packs after
Architecture: 64 Bit
Editions: Pro Only (Multi Edition, Compact & SuperLite, and SuperLite)
From Original MS Windows Build: 19043.1021 (21H1)
.NET Framework 3.5: Pre-Installed
DirectPlay: Enabled
MS Store: Included
Network Adapter Drivers: Included
Changelog / What's New:
Activation: Not pre-activated, Activator included on Desktop if needed
PREINSTALLED APPS:
DirectX D3DX9, D3DX10, D3DX11, XAudio 2.7, XInput 1.3, XACT Runtimes (June 2010) Pre-Installed
Visual C++ 2005 - 2019 Runtimes (x86 and x64)
7-Zip
MPC-BE
IrfanView
WinAeroTweaker
Old Calculator
Everything Search Engine
FireWall Enable/Disable Shortcuts
Windows Update Service Enable/Disable Shortcuts
Insider Icons
OPTIONAL APPS:
Activator
Chrome
Firefox
Edge
TinyWall Firewall
Registry Tweaks
TWEAKS:
Reduced Desktop Icon spacing
Increased wallpaper quality
Transparent task bar
Link State power Management added to power options
Many Services and System tweaks made to boost performance and reduce resource needs.
ADDED RIGHT CLICK CONTEXT MENU FOR:
Powershell
Kill tasks
Restart explorer
Send to desktop
Command Prompt
Command Prompt as admin
Take Ownership of files and folders
REMOVED:
Defender
Security Center
Cortana
Help
WinSXS
WinRE
IE
WMP
Edge
Backup and Restore
Xbox Live Services
Mixed Reality
Hyper-V
Speech
Spell Checking
Text Prediction
OneDrive
Additional Windows Features
Bitlocker
And more…
DISABLED:
Power Throttling
Ads
App Lookup
Automatic Maintenance
Download Blocking
Timeline
Error Reporting
Live Tiles
UAC
Telemetry
Hibernation
PageFile
Windows Firewall
PCI Express Link State Power Management
Windows 10 SuperLITE (1.3GB)
DOWNLOAD ISO FILE


Here You will get four radio buttons
Let’s Select the Minimal option and click Apply, and OK. System Configuration will now ask if you want to restart your system. Selecting Restart will immediately initiate the restart process, so be sure to save any active documents or projects.
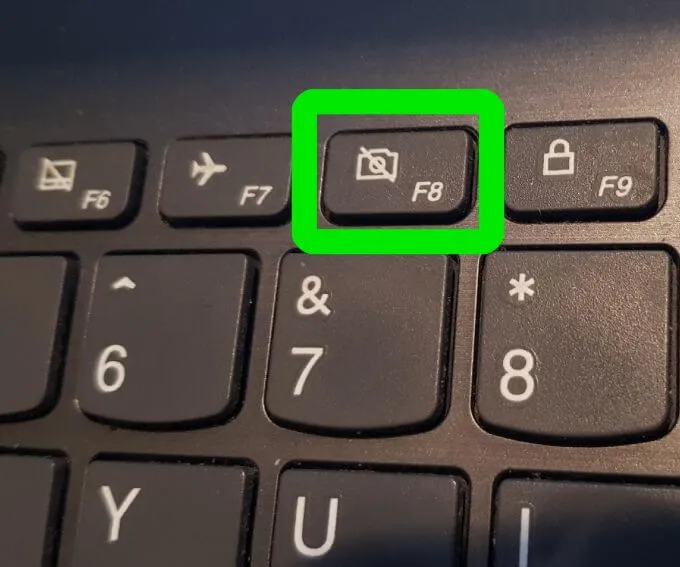
If you have started windows 10 in safe mode using F8 or from advanced startup options, this will only once start your computer in safe mode, once you restart your PC this will boot windows normally. But if you have started Windows 10 in Safe Mode Using System Configuration tool this will everytime start your PC into safe mode. And you need uncheck safe option mode under System Configuration tool to get out of windows safe mode. Let’s see how to do.
Safe Mode is an essential diagnostic method help you identify and fix possible causes of Windows 10 PC problems. When you start Windows 10 in safe mode it will only allow starting up basic system programs and services in the booting process. That means when you start your computer in safe mode the OS will be started with only core components, and many other non-necessary drivers or services such as video drivers, the sound will be disabled. For example, if Windows 10 freezes or restart frequently after installing a problematic driver or a third party software you can boot windows 10 in safe mode to uninstall the problematic driver or software to fix the problem.
Windows having Three Types of safe mode Options available.


4. Restart your computer for this change to be implemented.
After this, you should be able to Boot your computer in Safe Mode by repeatedly pressing the F8 key, while the computer is starting up.
Make sure that you are pressing and releasing the F8 key and not holding it down. If you miss the opportunity to Enter Safe Mode, simply restart your computer and repeat the process.
Start Windows 10 in Safe Mode from Settings
If you are alreay login into windows 10 computer, you can start Windows 10 in safe mode from advanced Startup tool and diagnose any issue.
You can access the advanced startup tool following the steps below.
Using settings:

From Start Menu
Also, you can press and hold Shift key on the keyboard, and click Start menu on Windows 10 at the same time. Then click the Power icon in the Start menu and choose Restart. This will open the Advanced Startup Screen.


Well if due to some problem or after install an incompatible driver or third party software Windows 10 won’t start normally you can follow steps below to boot into safe mode and fix the problem.
Using Automatic Repair
Basically when windows 10 computer won’t start normally 3 times it automatically enter into the Automatic Repair window and try to fix the problem itself.
Well If the Automatic Repair couldn’t repair your Windows 10 PC problems, click Advanced options.

If you are noticing that your computer is taking a few seconds longer to startup, disable F8 Key Safe Mode and see if this improves the startup time.
1. Right-click on the Start button and click on Command Prompt (Admin).


3. Close the Command Prompt window and Restart your computer.
After this, you won’t be able to boot your computer into Safe Mode by using the F8 Key.

Creating the Requirements
Before I begin it is important to explain what I’m looking for and the compromises I’m willing to make as building the most powerful and smallest anything don’t usually go together. First, the most important decision is the CPU. For the last few generations I have become an Intel i7 fan and with the recent Skylake platform, the i7-6700 is a no brainer. Although if I’m trying to build small, the low power “T” version (6700T) is a requirement to keep the heat down. RAM and storage are easy decisions, max out RAM and buy the best SSDs with a reasonable price. It would also be nice to find a budget friendly M.2 slot SSD to use as an OS drive as those have ridiculous performance and are about the size of a stick of gum.
Since I’m going for very small that pretty rules out dedicated graphics card. There is no way I am going to fit a NVidia GeForce GTX 980 into something smaller than a Mac Mini. While I need a graphics system powerful enough for my dual HD monitors, I don’t do a lot of PC gaming anymore (thanks to my XBOX), so I’m willing to compromise here. The good news is with the new Skylake platform, the integrated graphics is supposed to be decent with DirectX 12 support.
Speaking of form factor, as I mentioned earlier, my current desktop is a Mac Mini that is 7.75” x 7.75” x 1.5” tall. The hardware design is very good and it is completely silent most of the time. The Mac Mini also has an internal power supply but I’m willing to forgo that for an external power brick converter.
Finding the Ultimate Form Factor
The most difficult aspect of this build is finding the right form factor package. With my goal to go smaller than a Mac Mini, Mini-ITX is off the table (the smallest ITX cases I could find were over 1.5” tall). Custom designed motherboards and cases were my only hope. After a lot of research, I was unable to find any barebone kits in the target size. Shuttle came close but no Skylake support. While searching I stumbled across a new breed of “tiny” desktops from the big three PC makers. I never intended to buy a pre-built PC, but these PCs have the potential to be a custom barebones kit + CPU.
After looking into options built on the Skylake platform with a I7-6700T CPU. I narrowed down my choices to:

Pros

Pros

Pros
After considering the three options for my barebone system + CPU, I selected the Lenovo M900 Tiny because it meets everything I’m looking for, and the price is almost $200 cheaper. I also like how Lenovo’s web site provides more control over what is included with the PC. I was able to further decrease the cost by getting rid of the stand, keyboard and mouse. I only wish Lenovo allowed me to buy the system without any RAM and HDD because those items will also be tossed aside.
Customizing the Inside
Now that the case, motherboard and CPU have been selected, it is time to pick out the OS drive, storage drive and RAM.
For the OS boot drive I wanted to take advantage of the internal M.2 slot that is an internal expansion slot that can act as a PCI Express 3.0 interface. This interface is significantly faster than the common Sata 3.0 interface that limits SSD drives to around 500 MB/s sequential read and write. With the PCI Express interface, SSD drives can attain sequential read and write speed well over 2000 MB/s. If I’m building the ultimate Windows 10 desktop, I absolutely need this! After shopping around

For the storage drive I typically would look for a multi TB traditional hard drive, but with the prices of 2.5” SSD drives falling from the sky, I was able to find a 1TB Samsung 850 EVO

The Intel Skylake platform is one of the first to take advantage of DDR4 RAM. With that comes a big jump in memory speed but the Lenovo M900 motheboard, like all other tiny form factors, only have two SODIMM slots. To max out the RAM I had to use 16 GB modules which are rather limited right now given how new DDR4 is on the market. I usually like to buy Kingston HyperX memory but 16GB dims are not yet available so I had to settled on a 32 GB kit of DDR4 2133 (PC4 17000) from G.SKILL that I have no experience with but receive good reviews.

Everything has been ordered and will arrive over the next two weeks for assembly and then the fun begins. Here is the final build list:
Now that all of the parts for the build have arrived, we can begin assembling our ultimate Windows 10 micro PC., I selected the Lenovo M900 Tiny with the SkyLake based i7-6700T as the foundation for this build. To make this the ultimate micro pc, we will be upgrading the ram to 32 GB, installing a 256 GB M.2 PCI Express 3.0 SSD, and a 1 TB SSD for even more storage.
Assembly
Working with the M900 tiny form factor is very easy, simply remove the large screw on the back of the PC and slide the top towards the front.

Once inside, the RAM and M.2 PCI-Express slots are hidden under the HDD caddy. Remove the thumb screw (may need the help of a Philips screwdriver) and slide the caddy towards the front of the PC.

Now that we have access to the RAM and M.2 card slots, it is very easy to install the new 256 GB Samsung 950 Pro into the M.2 slot.

Installing the 32 GB of G.Skill DDR4 ram is also very straight forward. Thankfully there were no intel chipset compatibility issues with this DDR4 memory.

When installing the RAM, I noticed there is a bonus M.2 card slot the system board that I didn't notice on the Lenovo spec sheet. It looks like this is where the factory wireless connectivity option is installed so there is some hope if you want to add Wi-Fi and Bluetooth connectivity down the road.

Finally, it is time to replace the stock 500 GB traditional hard drive in the caddy with the 1 TB Samsung 850 EVO SSD. Once the new SSD is mounted in the caddy, just slide back onto the mounting posts from the front towards the back and lock it in place with the thumb screw.
Installing Windows 10 Pro
To install Windows 10, I used en_windows_10_multiple_editions_version_1511_x64_dvd_7223712.iso (Build 10586) downloaded from MSDN that I copied to a USB flash drive using these instructions. Installation was straightforward as the installer thankfully included drivers for the storage controller so I could install Windows 10 directly onto the 256 GB Samsung 950 Pro.
The only negative is build 10586 did not include the Intel Ethernet drivers so I had to download those from Lenovo’s web site here.